
We offer two ways to pay. If you don’t own cryptocurrency, the fastest way is Method 1, which lets you use your standard Credit or Debit card to buy the required crypto directly at checkout.
If your card is declined by your bank, or you already own crypto, use Method 2.
Method 1: Pay Directly with a Credit/Debit Card (Fastest)
You do not need to download a separate crypto app for this. Our system uses secure third-party providers to process your card and convert it to crypto automatically.
Step 1: Choose a Provider at Checkout
On the checkout page, you will see a list of credit card options. Choose the one that fits your location:
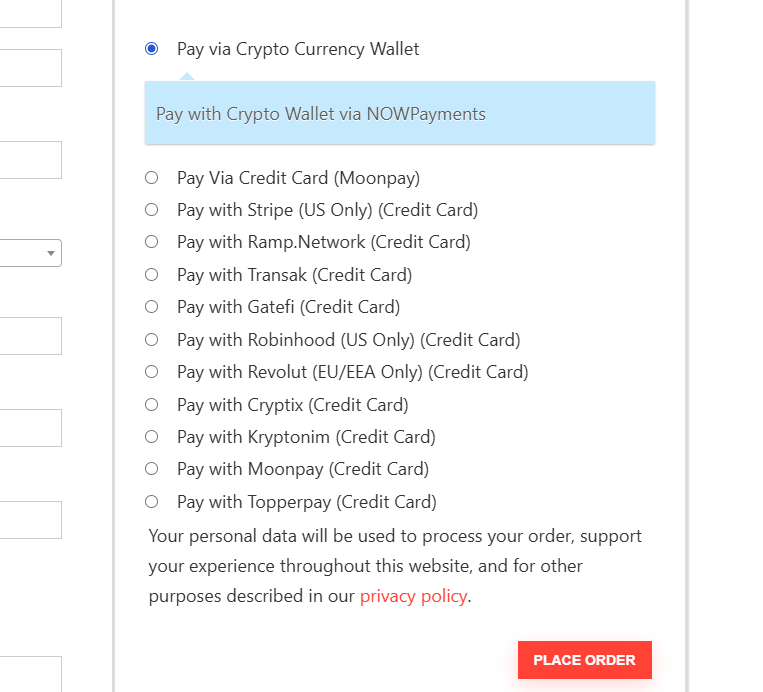
- US Customers: Select Stripe (US Only) or Robinhood (US Only).
- European Customers: Select Revolut (EU/EEA Only).
- Global Customers: Select Moonpay, Transak, or Ramp.Network.
Step 2: Place Your Order
Select your preferred provider and click Place Order. You will be redirected to the provider’s secure payment portal.
Step 3: Complete Identity Verification & Payment
Because you are technically purchasing cryptocurrency in the background, financial regulations require a quick identity check.
- Enter your email and basic details.
- Enter your Credit/Debit card details.
- Confirm the payment. The provider will automatically send the crypto to our system, and your subscription will activate in 2 to 5 minutes.
Note: The provider will charge a small processing fee, which will be shown before you confirm the payment.
Method 2. Pay Using Crypto (Zero Experience Needed)
If you have never used cryptocurrency before, don’t worry. It is very similar to using a digital wallet like PayPal or Apple Pay.
You are simply going to:
- Download a crypto app (like a digital bank).
- Buy USDT (a digital coin worth $1 USD).
- Send that USDT to us to pay for your subscription.
Follow this guide step-by-step.
Part 1: The Setup (One-Time Only)
You need an app to hold your digital money. We recommend Binance because it is the biggest and safest in the world, but you can also use OKX or Bybit.
- Download the App: Go to the App Store or Google Play and install Binance.
- Sign Up: Create an account using your email or phone number.
- Verify Your Identity (Important):
- Just like opening a bank account, you must verify who you are.
- Upload a photo of your ID (Passport or Driver’s License) and take a selfie when asked.
- This usually takes 10–30 minutes to get approved.
Video Toturial How Create an Account on Binance
Video Link: https://www.youtube.com/watch?v=64TPgJz69wA
How to Complete KYC: https://www.youtube.com/watch?v=yvtGCZ8ENEQ
⚠️ Important Note for New Accounts:
After you buy crypto for the first time, some apps may lock your ability to withdraw (send money) for 24 hours for security. We recommend setting up your account 1 day before you need to pay.
Part 2: How to Buy USDT (Digital Dollars)
You need to buy USDT (Tether). This is a stable coin, meaning 1 USDT always equals roughly $1 USD. It does not go up and down in value like Bitcoin.
There are two ways to buy it. Try Method A first.
Method A: Credit/Debit Card (Fastest)
- Open the app and tap “Add Funds” or “Buy Crypto”.
- Select Credit/Debit Card.
- Choose currency: USD (or your local currency).
- Choose coin: USDT.
- Enter the amount.
- Tip: Buy $2–$3 MORE than the subscription price to cover small fees.
- Pay with your card.
Video Tutorial: How to Buy with a Credit Card: https://www.youtube.com/watch?v=t0qW740bAn0
Method B: P2P Trading (If your Bank declines the card)
If your bank blocks the transaction in Method A, use P2P (Peer-to-Peer). This lets you buy USDT from a verified local seller using a normal bank transfer.
- On the app home screen, tap P2P Trading.
- At the top, ensure it says “Buy” and “USDT”.
- Select your local currency (e.g., USD, EUR, PKR, INR).
- You will see a list of sellers. Choose a seller who:
- Has a high completion rate (95% or higher).
- Has many orders (100+).
- Has a “Yellow Tick” badge (Verified Merchant).
- Tap Buy, enter the amount of money you want to spend.
- The app will show you the seller’s bank details.
- Go to your banking app and transfer the money to them.
- IMPORTANT: Come back to the crypto app and tap “Transferred, Notify Seller”.
- Wait 2–5 minutes. The seller will release the USDT to your account.
Video Tutorial: How to Do P2P: https://www.youtube.com/watch?v=cld4bNfixTc
Part 3: Sending the Payment to Us
Now that you have USDT in your app, you need to send it to us.
- Go to your “Wallets” tab in the app.
- Note: If you bought via P2P, your money is in the “Funding” wallet. If you bought with a card, it might be in the “Spot” wallet.
- Tap Withdraw (this means “Send”).
- Select USDT.
- Select “Send via Crypto Network”.
Video Tutorial: https://www.youtube.com/watch?v=GSK84oTrSk4
CAREFULLY Enter Our Details:
Go to our website checkout page and copy the details:
- Address: Paste the long code from our checkout page (starts with
0x...). - Network: Select BNB Smart Chain (BEP20).
- ⚠️ WARNING: You MUST select BNB Smart Chain (BEP20). If you select Ethereum (ERC20) or Tron (TRC20), we will NOT receive the money.
- Amount: Enter the exact amount shown on our checkout, PLUS the network fee.
- Example: If we ask for 11.00 USDT, and the App says the “Network Fee” is 0.29, you must type 11.29.
- Check the bottom of the screen to see “Receive Amount”. Ensure it matches our price exactly.
- Tap Withdraw and confirm.
Common Problems & Solutions
1. “I have money, but it says Insufficient Balance.”
- Reason: You are trying to send all your money without leaving space for the “Network Fee” (Gas fee).
- Solution: You need about $0.30 extra in your account. If you have exactly $10 and the price is $50, you cannot send it. You need $10.30.
2. “I can’t find my money in the Withdraw list.”
- Reason: Your money is likely in the “Funding” wallet, but you are looking at the “Spot” wallet.
- Solution: In the app, go to Wallets -> Transfer. Move your USDT from Funding to Spot. Then try to withdraw again.
3. “Withdrawal Suspended / Risk Warning.”
- Reason: If you just created the account today, the app might block withdrawals for 24 hours to protect you from fraud.
- Solution: You must wait 24 hours. This is a security rule by the app, not us.
Refund Policy & Critical Safety Warning
Please read this carefully before sending money. Unlike credit cards or PayPal, cryptocurrency transactions are permanent. Once you click “Send,” the money is gone and cannot be reversed by anyone, including us or the crypto app support.
Because of this technology, we cannot offer refunds for crypto payments.
1. Why are payments final?
Cryptocurrency works like digital cash. There is no bank or middleman to reverse a transaction. If you make a mistake, the money is often lost forever on the blockchain.
2. What happens if I make a mistake?
- If you send to the Wrong Network: If you send USDT via a network other than BNB Smart Chain (BEP20) (for example, if you use Ethereum/ERC20), we will not receive the funds, and we cannot recover them. Your money will be lost.
- If you send to the Wrong Address: If you copy/paste the wrong wallet address, the money will go to a stranger and cannot be recovered.
- If you send the Wrong Amount:
- Underpayment: If you send less than the required amount (even by $0.01), the system will not activate your subscription. You will need to contact support to resolve this manually.
- Overpayment: If you send too much, we cannot refund the difference due to network transaction fees.
How to stay safe:
✅ Always Copy & Paste: Never type the wallet address by hand. Use the “Copy” button. ✅ Check the Network: Ensure both your app and our checkout say BNB Smart Chain (BEP20). ✅ Double Check: Look at the first 3 and last 3 characters of the address before clicking send.
Need Help? If you are unsure about anything, please contact our support team BEFORE you pay. We are happy to guide you through your first payment to ensure it goes smoothly.